ALB の挙動を確認してみる

ALB を設定して効果を見てみたいと思います。
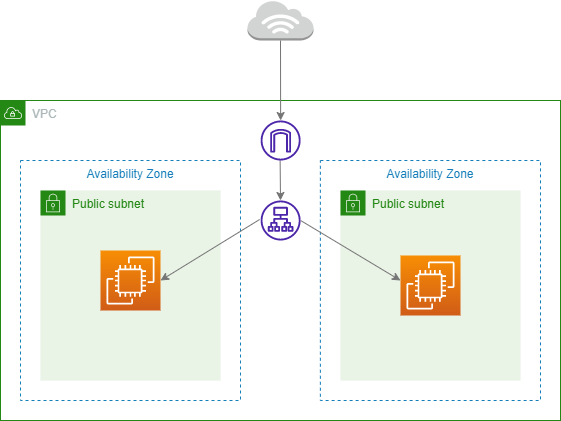
構成はシンプルで次の通りです。
- Cloud Formation で構築する
- Nginx のページを編集する
- ターゲットグループを作成する
- ロードバランサーを作成する
- 確認する
参考
Cloud Formation で構築する
ALB 以外の設定は、Cloud Formation でしてみます。
Cloud Formation の設定は別の記事でまとめたのでここでは割愛します。
AWSTemplateFormatVersion: "2010-09-09"
Description: "CloudFormation Template Test"
# Setting key and IP
Parameters:
  KeyName:
    Description: The EC2 Key Pair to allow SSH access to the instance
    Type: "AWS::EC2::KeyPair::KeyName"
  MyIP:
    Description: IP address allowed to access EC2
    Type: String
Resources:
  # VPC
  HogeVPC:
    Type: AWS::EC2::VPC
    Properties:
      CidrBlock: "10.0.0.0/16"
      EnableDnsSupport: "true"
      EnableDnsHostnames: "true"
      InstanceTenancy: "default"
      Tags:
        - Key: Name
          Value: "hoge-vpc"
  # InternetGateway
  HogeInternetGateway:
    Type: AWS::EC2::InternetGateway
    Properties:
      Tags:
        - Key: Name
          Value: "hoge-igw"
  HogeAttachment:
    Type: AWS::EC2::VPCGatewayAttachment
    Properties:
      VpcId: !Ref HogeVPC
      InternetGatewayId: !Ref HogeInternetGateway
  # Subnet
  HogePublicSubnetA:
    Type: AWS::EC2::Subnet
    Properties:
      AvailabilityZone: "ap-northeast-1a"
      CidrBlock: "10.0.0.0/24"
      VpcId: !Ref HogeVPC
      Tags:
        - Key: Name
          Value: "hoge-public-subnet-1"
  HogePublicSubnetB:
    Type: AWS::EC2::Subnet
    Properties:
      AvailabilityZone: "ap-northeast-1c"
      CidrBlock: "10.0.1.0/24"
      VpcId: !Ref HogeVPC
      Tags:
        - Key: Name
          Value: "hoge-public-subnet-2"
  # RouteTable
  HogePublicRouteTable:
    Type: AWS::EC2::RouteTable
    Properties:
      VpcId: !Ref HogeVPC
      Tags:
        - Key: Name
          Value: !Sub hoge-public-routetable
  HogePublicRoute:
    Type: AWS::EC2::Route
    Properties:
      RouteTableId: !Ref HogePublicRouteTable
      DestinationCidrBlock: 0.0.0.0/0
      GatewayId: !Ref HogeInternetGateway
  # Subnet to attach
  HogePublicSubnetARouteTableAssociation:
    Type: AWS::EC2::SubnetRouteTableAssociation
    Properties:
      SubnetId: !Ref HogePublicSubnetA
      RouteTableId: !Ref HogePublicRouteTable
  HogePublicSubnetBRouteTableAssociation:
    Type: AWS::EC2::SubnetRouteTableAssociation
    Properties:
      SubnetId: !Ref HogePublicSubnetB
      RouteTableId: !Ref HogePublicRouteTable
  # EC2
  EC2A:
    Type: AWS::EC2::Instance
    Properties:
      ImageId: ami-00d101850e971728d
      KeyName: !Ref KeyName
      InstanceType: t2.micro
      NetworkInterfaces: # assign public IP
        - AssociatePublicIpAddress: "true"
          DeviceIndex: "0"
          SubnetId: !Ref HogePublicSubnetA
          GroupSet:
            - !Ref EC2SG
      UserData: !Base64 | # coding commands what you want
        #!/bin/bash
        sudo amazon-linux-extras install -y nginx1
        sudo systemctl start nginx
      Tags:
        - Key: Name
          Value: hogeEC2A
  EC2B:
    Type: AWS::EC2::Instance
    Properties:
      ImageId: ami-00d101850e971728d
      KeyName: !Ref KeyName
      InstanceType: t2.micro
      NetworkInterfaces: # assign public IP
        - AssociatePublicIpAddress: "true"
          DeviceIndex: "0"
          SubnetId: !Ref HogePublicSubnetB
          GroupSet:
            - !Ref EC2SG
      UserData: !Base64 | # coding commands what you want
        #!/bin/bash
        sudo amazon-linux-extras install -y nginx1
        sudo systemctl start nginx
      Tags:
        - Key: Name
          Value: hogeEC2B
  # SecurityGroup
  EC2SG:
    Type: AWS::EC2::SecurityGroup
    Properties:
      GroupName: hoge-sg
      GroupDescription: Allow SSH and HTTP access only MyIP
      VpcId: !Ref HogeVPC
      SecurityGroupIngress:
        # http
        - IpProtocol: tcp
          FromPort: 80
          ToPort: 80
          CidrIp: !Ref MyIP
        # ssh
        - IpProtocol: tcp
          FromPort: 22
          ToPort: 22
          CidrIp: !Ref MyIP
Outputs:
  # Output EC2A status
  EC2APublicIP:
    Value: !GetAtt EC2A.PublicIp
    Description: Public IP of EC2A Ainstance
  # Output EC2B status
  EC2BPublicIP:
    Value: !GetAtt EC2A.PublicIp
    Description: Public IP of EC2B Ainstance
下の部分で環境構築と同時に Nginx をインストールして起動しています。
sudo amazon-linux-extras install -y nginx1
sudo systemctl start nginx
Nginx のページを編集する
環境が作れたら ssh ができるようにし、
EC2B の方だけ Nginx のページの 「welcomt to Nginx on Amazon Linux!」を「「welcomt to Hoge on Amazon Linux!」に変更しておきます。
(かなり乱暴にですが)コマンドは次の通りです。
ssh hogeEC2B "sudo sed -i s/nginx/hoge/g /usr/share/nginx/html/index.html"hogeEC2B にアクセスすると「Welcome to hoge on Amazon Linux!」となっているかと思います。
ターゲットグループを作成する
- 「EC2」と検索して「EC2」をクリックする。
- 左のメニューの「ターゲットグループ」をクリックする。
- 「Create target group」をクリックする。
- 各項目を下記の通りに設定する。
- Basic configuration
- Choose a target type
→ Instances - Target group name
→ hoge-target-group - Protocol: Port
→ HTTP: 80 - VPC
→ hoge-vpc - Protocol version
→ HTTP1
- Choose a target type
- Health checks (デフォルトのまま)
- Health check protocol
→ HTTP - Health check path
→ /
- Health check protocol
- Basic configuration
- 「Next」を押す。
- 「Available instances」で Name に「hogeEC2A」「hogeEC2B」があるのでチェックを付ける。
- 「include as pending below」をクリックする。
- 「Review targets」に選択した項目が移動したのを確認する。
- 「Create target group」をクリックする。
ロードバランサーを作成する
- 左のメニューの「ロードバランサー」をクリックする。
- 「ロードバランサーの作成」をクリックする。
- 「Application Load Balancer」の下の「Create」をクリックする。
- 各項目をを以下の通りに設定する。
- Load balancer name
- hoge-alb
- Scheme
- Internet-facing
- IP address type
- IPv4
- Network mapping
- VPC
→ hoge-vpc - Mappings
→ ap-northeast-1a にチェックを付ける。
→ ap-northeast-1c にチェックを付ける。
- VPC
- Security groups
- hoge-sg
- Listeners and routing
- Protocol
→ HTTP - Port
→ 80 - Default action
→ hoge-target-group (先ほど作成したもの)
- Protocol
- Load balancer name
- 「Create load balancer」をクリックする。
確認する
ヘルスチェックを確認する
まずは両方のサーバーが正常に動いているのを確認します。
- 「EC2」と検索して「EC2」をクリックする。
- 左のメニューの「ターゲットグループ」をクリックする。
- 「hoge-target-group」をクリックする。
- 画面下の「Targets」タブ内の「Register targets」をクリックする。
- 画面下の「Review targets」の 「Health status」が二つとも「healthy」になっているのを確認する。
ロードバランサーの DNS 名からアクセス出来るのを確認する
ロードバランサーの「DNS 名」からアクセスしてどちらのサーバーのページが開くか確認してみます。
- 左のメニューの「ロードバランサー」をクリックする。
- 「DNS 名」の「hoge-alb-xxxxxxxxxx.ap-northeast-1.elb.amazonaws.com」をブラウザで表示する。
- 「Welcome to hoge on Amazon Linux!」と hogeEC2B の方が表示されました。なので今回は、hogeEC2B の方を止めてみます。
ヘルスチェックが unhealthy になっているのを確認する
ページが表示された方の Nginx を止めてみます。
- ssh hogeEC2B "sudo systemctl stop nginx" で hogeEC2B の Nginx を止める。
- 上記「ヘルスチェックを確認する」で開いたページの hogeEC2B が「unhealthy」になっているのを確認する。
再確認
hogeEC2B が止まったようなので hogeEC2A が動いているのを確認してみます。
- サイド「DNS 名」をブラウザで開くと「Welcome to nginx on Amazon Linux!」と表示されているのを確認する。